Have you ever removed bike pedals? If you’re an outdoor enthusiast or simply an on-the-go individual, bike riding is one of the most enjoyable and cost-effective ways to commute or stay fit. However, bike enthusiasts constantly face the challenge of removing their pedals, especially if it’s for the first time. The good news is that it’s a relatively simple procedure, and this blog post will provide you with everything you need to know about taking your bike pedals off. We’ll discuss why you may need to remove your pedals, the tools needed, step-by-step instructions, and some useful tips. Keep reading to learn more!
Why You Might Need to Remove Your Pedals
There are a few reasons why you might need to take the pedals off your bicycle. For instance, if you want to replace worn-out pedals or want to upgrade to more comfortable or more efficient pedals. Additionally, if you’re transporting your bike, removing the pedals is a useful way to save space in your vehicle. Finally, removing the pedals may also be necessary if you’re overhauling your bike or replacing the bottom bracket.
Tools Needed
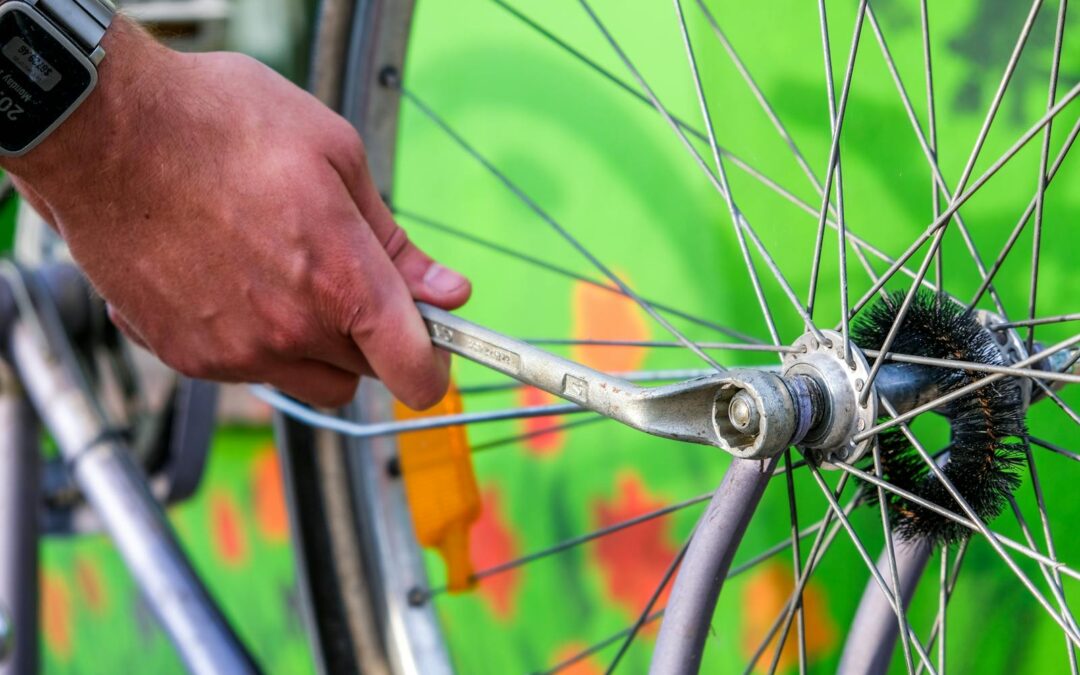
Fortunately, to remove pedals requires just a few basic tools. First, you will need a pedal wrench that’s fit for your bike model. The pedal wrench is a specialized spanner that enables you to remove and install pedals with ease. Besides a pedal wrench, you may also need a screwdriver or pliers (depending on whether the pedals have a conventional nut or are newer designs with screws that require an Allen key to be inserted into the pedal axle). Overall, it is a simple process that any bike enthusiast can take on.
Removed Bike Pedals: Step by Step Instructions
Step 1: Start by standing your bike upright on level ground or using a bike stand if you have one available.
Step 2: Identify the pedals that need to be removed and check if they have any protective caps or seals that need to be removed before proceeding.
Step 3: Place your pedal wrench on the pedal’s bolt, moving in the pedal thread direction, with the wrench handle pointing forward, and rotate the wrench towards the back of the bike.
Step 4: Repeat step 3 for the opposite crank, turning the wrench towards the front of the bike.
Step 5: Remove the pedals from the crank arms, then wipe them clean and apply lubrication to the spindles, making sure to reinstall them correctly without a stuck pedal.
Useful Tips
First, make sure you rotate the wrench in the correct direction (opposite of the way you pedal), as pedals are designed to self-tighten as you ride. Additionally, it’s necessary to note that the left pedal has a reverse thread, so rotating it clockwise loosens it. The right pedal is standard threaded, so rotating it clockwise tightens it. It’s also important to note that proper placement is critical when reinstalling your pedals; the right pedal should go on the right crank arm, and the left on the left. Be sure to pay attention to this if you have flat pedals. Finally, ensure your tools fit securely around the pedals, so you don’t slip or damage the pedals in the process.

Which Bike Pedal Is Reverse Threaded?
As a cyclist, it is essential to know the mechanisms that keep your bicycle functioning well. One of the important parts is the pedals, which transfer your leg energy to the bike’s crankset. While most pedals follow a standard thread, some may have a reversed thread. It is essential to know which one of your bicycle pedals are reverse threaded to avoid damaging your bike. Next, we will explore the types of pedal threads and which bike pedal is reverse threaded.
Pedals have different types of threads that differ based on the side of the pedal. The right pedal has threads that screw clockwise into the bike’s crankset, while the left pedal’s threads screw counter-clockwise into the crankset. The standard thread is a right-hand thread, meaning you need to turn the pedals to the right or tighten the pedals by turning the spindle clockwise. However, some companies produce pedals with reverse threads, which are not as common as the right threads.
The left pedal is the most likely to have a reverse thread, and it is used to prevent the left pedal from loosening while cycling. The reverse thread allows the pedal to stay tight when the cyclist pedals forward. The most common reverse thread pedal is the left pedal of a BMX bike. BMX stands for bicycle motocross; hence, the left pedal is designed to be more durable for jumps, wheelies, and other BMX tricks but you may see L and R marking on axle wrench flats.
Another bike pedal that often has a reverse thread is the track bike’s left pedal. Track bikes are mainly used for racing in smooth, flat stages. The left pedal’s reversed thread is used as a safety measure and to keep the pedal from loosening during a race. However, it is important to check the type of thread on the pedals before changing or removing them.
Pocket bikes, which are miniature motorcycles designed for racing, are another type of bike that may have pedals with a reverse thread. The pedal’s reversed thread prevents the pedal from falling off while pocket biking, where riders often perform stunts, jumps, and other extreme maneuvers.
Knowing which bike pedal is reverse threaded is essential in maintaining your bicycle’s performance and will make it easier to change bike pedals. The left pedal is the most common bike pedal with a reverse thread, and it is also found in BMX and track bikes. Before removing the pedals or installing new ones, it is important to check for the pedal’s thread type to avoid damaging your bike’s crankset. So, be a responsible cyclist and regularly check your bike pedals for optimal performance and safety.
Do You Need a Special Tool to Remove Bike Pedals?
Biking is a great way to stay active and get your heart pumping. Whether you prefer a leisurely ride or an intense workout, having the right bike setup is crucial. One component that can be tricky to deal with is removing bike pedals. It’s a task that can cause some confusion for newer or even experienced bikers. One of the most common questions that people ask when it comes to this task is, “Do I need a special tool to remove bike pedals?” Lastly, we’ll explore the answer to this question and provide you with some helpful tips to make the process smooth and easy.
The Short Answer Is Yes.
You do need a special tool to remove bike pedals. The tool in question is called a pedal wrench, and it’s designed to fit around the pedal spindle and give you the leverage you need to loosen it. The reason for this is that bike pedals are attached to the bike cranks using a thread system. This means that the left pedal has a left-hand thread and must be turned counterclockwise to loosen, while the right pedal has a standard right-hand thread and must be turned clockwise. Trying to use a regular wrench or pliers can result in stripping the threads or damaging the pedal body.
How Do You Use a Pedal Wrench to Remove Bike Pedals?
First, locate the pedal you want to remove and position the bike so that you have access to it. Then, insert the jaws of the pedal wrench onto the flat sides of the pedal spindle. Make sure the jaws are fully engaged to avoid slipping and damaging the pedal. Apply pressure to the wrench handle in the direction that loosens the pedal – counterclockwise for the left pedal and clockwise for the right pedal. It may require some force to get the pedal to budge, especially if it’s been on for a while. Once you’ve loosened the pedal, continue turning it by hand until it’s fully removed from the crank arm.
Don’t Have a Pedal Wrench on Hand?
There are a few alternative tools you can use to remove your bike pedals, albeit with less efficiency and convenience. One option is a regular open-end wrench that fits snugly around the pedal spindle. Another choice is an adjustable wrench, although this tool can be bulky and may not fit into tight spaces. Lastly, if you’re out and about without any tools, you can use a rock, stick, or other hard object for leverage. However, keep in mind that these improvised tools can damage the pedals over time and may not be the best long-term solution.
When it comes to reinstalling your bike pedals, it’s important to take care to avoid cross-threading, which can cause damage to the pedal and crank arm threads. Start by threading the pedal into the crank arm by hand, making sure to keep the correct orientation – the left pedal should thread counterclockwise, while the right pedal should thread clockwise. Once you’ve threaded it in as far as you can go, use the pedal wrench to finish tightening it. Be careful not to over-tighten, as this can lead to damage or breakage of the pedal or crank arm.
Removing bike pedals may seem daunting, especially if you’re new to the hobby, but with the right tools and knowledge, it doesn’t have to be a headache. A pedal wrench is the most efficient and reliable tool for removing and reinstalling bike pedals due to its specialized design. However, in a pinch, a regular open-end wrench or other improvised tools can work as well. Always make sure to thread the pedals correctly to avoid cross-threading, and don’t forget to use some elbow grease to get those pedals off! With a little practice, you’ll be an expert in no time.

Conclusion:
Removing bike pedals is an essential skill for any bike rider, and it’s simpler than most people think. With this step-by-step guide, you can effortlessly take off your bike pedals and tackle any upgrades or maintenance your bike requires. Remember, the key to an easy process is to have the right tools and take the right precautions. By following our tips, you can be confident that you’re removing your pedals correctly and safely. Give it a try, and you’ll soon be able to remove your bike pedals with ease!
Myrtle Beach Bicycles
If you have any questions about removing your bicycle pedals, or if you need assistance with removing them, stop by Myrtle Beach Bicycles


